A remodel might be on the cards if your walls look worse for wear or the paint is flaking. Generally, lead is a harmful pollutant, and lead-based paint has been banned in the U.S. since 1978 as it poses health and safety concerns. So, consider removing lead paint if your den dates back to that era.
Fortunately, lead paint removal isn’t a painstaking process. You can either hire an expert for the job or use our easy-to-follow guide to do away with the lead paint safely so your family can rest easy. Here’s how to go about it:
- Prep Your Space
Prepare the area you need to work in by removing furniture and other movable objects. This limits their exposure to lead dust as you later scrape or sand surfaces. Likewise, turn off the HVAC system to prevent contamination.
Use plastic sheeting to cover immovable or heavy objects, floors, and air vents. While at it, use duct tape to secure the edges of the plastic sheets. Also, keep the windows and doors closed to prevent paint dust from escaping into other rooms or your neighbors’ properties.
Ensure all the supplies are in the room so you don’t have to leave the area once work begins- doing so might track lead particles to other rooms. A sticky pad placed outside can trap bits of lead dust or chips.
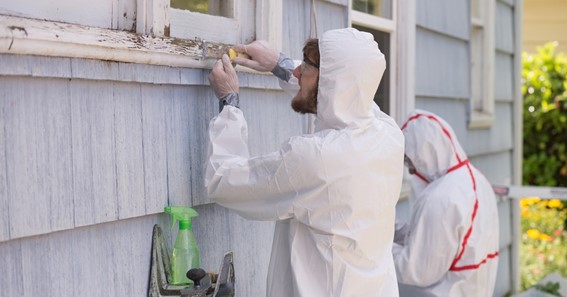
- Mind Your Safety
To keep your body and clothes free of contaminated lead paste, wear coveralls, and put on a respirator to avoid breathing in harmful fumes. Disposable shoes or shoe covers, goggles, hats, and rubber gloves should also be part of your safety gear. Keep other family members or pets out of the workspace until you are done and the area is clean.
- Work Wet
Airborne lead dust can be dangerous. The idea behind working ‘wet’ is to prevent lead particles or dust from filling the air.
Mist the work surfaces with water from a spray bottle. Use a damp rag to wet areas around electrical switches or outlets to avert the risk of electrocution. Once that’s done, scrape away peeling paint with a metal scraper, and keep spraying as you continue working.
A trusty heat gun comes in handy if you plan to remove paint from large areas or eliminate multiple layers of paint. In that case, a low to medium heat setting works best- below 700 degrees Fahrenheit.
If some of the scraped areas appear rough, smooth them out by hand using a sanding sponge. After sanding, wipe the area with a damp rag. Avoid using a power sander as this quickly leads to dust buildup in your work area.
- Paint
Once your surfaces are free of bumps, it’s time to get out the paint and paintbrushes. Apply a fresh coat of lead-free paint over your surfaces. Depending on the condition of your walls, you might need a second coat to create a uniform look.
- Post-Work Cleanup
Clear the debris and dirty rags and place them in plastic bags upon completing your fix-up project. Carefully remove the plastic sheeting by folding it inward to contain the lead particles and putting it in a plastic bag. It would be best if you also found out whether your local authorities allow you to dispose of lead waste with other garbage.
Use a HEPA-certified vacuum to clear lead dust from the work area. Avoid using a conventional household vacuum, which can redistribute lead dust to other rooms.
- Wash The Surfaces
Use all-purpose cleaner and water to scrub floors, door frames, and all the other surfaces that may have been exposed to lead dust. For best results, work on a small area with a disposable rug and rinse it as you proceed until you’ve spruced up the entire room. It’s advisable to use separate buckets—one for rinsing and the other for general cleaning.
If you need to clean walls, start from the top and work your way down. Remember to change your water often. Afterward, put your cleaning supplies in a garbage bag and seal them with duct tape.
- Countercheck Your Work
Walk around your work area as you look carefully to ensure the room is spotless and free of lead dust or chips. Rub a cleaned surface with a baby wipe or disposable towel for signs of dust. You will need a do-over if you see chips or dust on the surface.
Overall, you eliminate your exposure to a toxic substance by safely removing lead paint. By adhering to the laid-out safety precautions, you can complete your renovation project successfully and give your surfaces a new lease of life. If you’d prefer to hire a pro for the job, get in touch with a reputable one in your area.